Weblogic Administration Console:
Web browser-based, graphical user interface to manage an Oracle WebLogic Server domain.
Use the Administration Console to:
Create /Clone/ Cluster/Start/Stop Managed servers.
Manage Datasources and connection pools
Deploy java EE applications
Change passwords.
View and Manage Log files related to WLS
Change Ports for Weblogic server and Java components.
Configure, start, and stop WebLogic Server instances
Configure WebLogic Server clusters
Configure WebLogic Server services, such as database connectivity (JDBC) and messaging (JMS)
Configure security parameters, including managing users, groups, and roles
Configure and deploy your applications
Monitor server and application performance
View server and domain log files
View application deployment descriptors
Edit selected run-time application deployment descriptor elements
How to access the Weblogic Administration Console:
Once administration server started, we can access the weblogic administration console using
http://<hostname:<port>/console
Incase of https
https://<hostname:<secure -port>/console, will get the login page:

Pass username and password which set while created the weblogic domain, wll get the main page:

To make changes in configuration Via Weblogic console:
Before saving and activating any changes we have to obtain the domain configuration lock.This protection is to avoid changes from any other users during the edit session.
(i)Click on Lock & Edit and obtain lock configuration.
(ii)Make required changes and save it.
(iii)If any configuration level changes are in pending,Lock & Edit would be as Activate changes. Click Activate Changes to confirm the made changes.
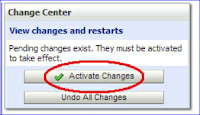
Before activating all made changes are saved in directory $DOMAIN_HOME/pending and contains a new version of the configuration files (config.xml).AS Activate Changes button clicked,Administration Server issues a command to all the WebLogic Managed Server to update the configuration.If changed configuration is not accepted by any of the Managed Servers will be rolled back and error will be shown by Console. If configuration is accepted,changes will be activated and the configuration files will be updated.
Creating managed server: This can be done vie console as well as backend(with command):
with console:
(i)Click Lock and Edit.
(ii) select Environment > Servers>Servers table>click new
(iii)On the Create a New Server: Server Properties page.
a.Enter the name of the server in the Name field.
b.In Listen Address,if you want to limit the valid addresses for a server instance, enter an IP address or DNS name.For example, enter 12.34.5.67 or mymachine, respectively. Otherwise, URLs to the server can specify any of the host computer's IP address, any DNS name that maps to one of the IP addresses, or the localhost string. The value you specify for the listen address is not the URL to the host machine and it does not include the communication protocol, listen port, or channel.
c.In Listen Port,enter the port number from which you want to access the server instance.
d.Specify whether or not this server will be a stand alone server or will belong to a cluster.
If this server is part of a cluster:
Select an existing cluster from the drop down list.
Select the button to create a new cluster
e.Click Next.
f.Review the configuration options you have chosen.
g.Click Finish.
(iv)To activate these changes, in the Change Center of the Administration Console, click Activate Changes. Not all changes take effect immediately—some require a restart.
Creating a cluster:
(i)click Lock & Edit
(ii)In the left pane of the Console, select Environment > Clusters.
(iii)Click New and select Cluster.
(iv)On the Cluster Properties page:
a.In Name, enter a unique name for your new cluster.
b.In Messaging Mode, select the messaging mode you want to use for this cluster.
If you are creating a cluster within an existing WebLogic Server environment or you need to ensure backward compatibility with older versions of WebLogic Server, you must use the multicast messaging type. IP multicast is a simple broadcast technology that enables multiple applications to subscribe to a given IP address and port number and listen for messages.
c.If you are using the unicast messaging mode, enter the unicast broadcast channel in Unicast Broadcast Channel. This channel is used to transmit messages with the cluster. If you do not specify a channel, the default channel is used.
d.If you are using the multicast messaging mode:
Enter the multicast address of the new cluster in Multicast Address. A multicast address is an IP address in the range from 224.0.0.0 to 239.255.255.255. The valid range is from 224.0.0.0 to 239.255.255.255. The default value used by WebLogic Server is 239.192.0.0. You should avoid using multicast addresses in the range x.0.0.1. This address must be unique to this cluster and should not be shared by other applications.
Enter the multicast port for the new cluster in Multicast Port. The multicast port is used by cluster members to communicate with each other. Valid values are between 1 and 65535.
(v)Click OK.
(vi)To activate these changes, in the Change Center of the Administration Console, click Activate Changes.Not all changes take effect immediately—some require a restart
Command to get console url:
echo "http://"$(cat $CONTEXT_FILE | grep s_webhost | cut -d '>' -f2 | cut -d '<' -f1)"."$(cat $CONTEXT_FILE | grep s_wls_admin_domain | cut -d '>' -f2 | cut -d '<' -f1)":"$(cat $CONTEXT_FILE | grep s_wls_adminport | cut -d '>' -f2 | cut -d '<' -f1)"/console"
Web browser-based, graphical user interface to manage an Oracle WebLogic Server domain.
Use the Administration Console to:
Create /Clone/ Cluster/Start/Stop Managed servers.
Manage Datasources and connection pools
Deploy java EE applications
Change passwords.
View and Manage Log files related to WLS
Change Ports for Weblogic server and Java components.
Configure, start, and stop WebLogic Server instances
Configure WebLogic Server clusters
Configure WebLogic Server services, such as database connectivity (JDBC) and messaging (JMS)
Configure security parameters, including managing users, groups, and roles
Configure and deploy your applications
Monitor server and application performance
View server and domain log files
View application deployment descriptors
Edit selected run-time application deployment descriptor elements
How to access the Weblogic Administration Console:
Once administration server started, we can access the weblogic administration console using
http://<hostname:<port>/console
Incase of https
https://<hostname:<secure -port>/console, will get the login page:

Pass username and password which set while created the weblogic domain, wll get the main page:

To make changes in configuration Via Weblogic console:
Before saving and activating any changes we have to obtain the domain configuration lock.This protection is to avoid changes from any other users during the edit session.
(i)Click on Lock & Edit and obtain lock configuration.

(ii)Make required changes and save it.
(iii)If any configuration level changes are in pending,Lock & Edit would be as Activate changes. Click Activate Changes to confirm the made changes.

Before activating all made changes are saved in directory $DOMAIN_HOME/pending and contains a new version of the configuration files (config.xml).AS Activate Changes button clicked,Administration Server issues a command to all the WebLogic Managed Server to update the configuration.If changed configuration is not accepted by any of the Managed Servers will be rolled back and error will be shown by Console. If configuration is accepted,changes will be activated and the configuration files will be updated.
Creating managed server: This can be done vie console as well as backend(with command):
with console:
(i)Click Lock and Edit.
(ii) select Environment > Servers>Servers table>click new
(iii)On the Create a New Server: Server Properties page.
a.Enter the name of the server in the Name field.
b.In Listen Address,if you want to limit the valid addresses for a server instance, enter an IP address or DNS name.For example, enter 12.34.5.67 or mymachine, respectively. Otherwise, URLs to the server can specify any of the host computer's IP address, any DNS name that maps to one of the IP addresses, or the localhost string. The value you specify for the listen address is not the URL to the host machine and it does not include the communication protocol, listen port, or channel.
c.In Listen Port,enter the port number from which you want to access the server instance.
d.Specify whether or not this server will be a stand alone server or will belong to a cluster.
If this server is part of a cluster:
Select an existing cluster from the drop down list.
Select the button to create a new cluster
e.Click Next.
f.Review the configuration options you have chosen.
g.Click Finish.
(iv)To activate these changes, in the Change Center of the Administration Console, click Activate Changes. Not all changes take effect immediately—some require a restart.
Creating a cluster:
(i)click Lock & Edit
(ii)In the left pane of the Console, select Environment > Clusters.
(iii)Click New and select Cluster.
(iv)On the Cluster Properties page:
a.In Name, enter a unique name for your new cluster.
b.In Messaging Mode, select the messaging mode you want to use for this cluster.
If you are creating a cluster within an existing WebLogic Server environment or you need to ensure backward compatibility with older versions of WebLogic Server, you must use the multicast messaging type. IP multicast is a simple broadcast technology that enables multiple applications to subscribe to a given IP address and port number and listen for messages.
c.If you are using the unicast messaging mode, enter the unicast broadcast channel in Unicast Broadcast Channel. This channel is used to transmit messages with the cluster. If you do not specify a channel, the default channel is used.
d.If you are using the multicast messaging mode:
Enter the multicast address of the new cluster in Multicast Address. A multicast address is an IP address in the range from 224.0.0.0 to 239.255.255.255. The valid range is from 224.0.0.0 to 239.255.255.255. The default value used by WebLogic Server is 239.192.0.0. You should avoid using multicast addresses in the range x.0.0.1. This address must be unique to this cluster and should not be shared by other applications.
Enter the multicast port for the new cluster in Multicast Port. The multicast port is used by cluster members to communicate with each other. Valid values are between 1 and 65535.
(v)Click OK.
(vi)To activate these changes, in the Change Center of the Administration Console, click Activate Changes.Not all changes take effect immediately—some require a restart
Command to get console url:
echo "http://"$(cat $CONTEXT_FILE | grep s_webhost | cut -d '>' -f2 | cut -d '<' -f1)"."$(cat $CONTEXT_FILE | grep s_wls_admin_domain | cut -d '>' -f2 | cut -d '<' -f1)":"$(cat $CONTEXT_FILE | grep s_wls_adminport | cut -d '>' -f2 | cut -d '<' -f1)"/console"
No comments:
Post a Comment